Simple Site - The site.json file
The site.json file is used to control a few of the more structural aspects of the web pages and relates to all of the pages that will be produced. It's content falls into three main parts: the meta, logos & links, and extras sections. The easiest method of creating your own site.json file is to copy the existing one that is provided with the project code and just edit it as needed. The sections shown below are cropped from a full file and contain descriptions rather than real values, for an example of real code please see this example site.json file.
The Meta values
'Meta elements are tags used in HTML and XHTML documents to provide structured metadata about a Web page'[1]. They are used to defined a selection of hidden information which can be used by search engines and web browsers. At this time this project only makes use of 5 of these meta elements, further values could be added if required but this would require making adjustments to the project code rather than just the JSON file.
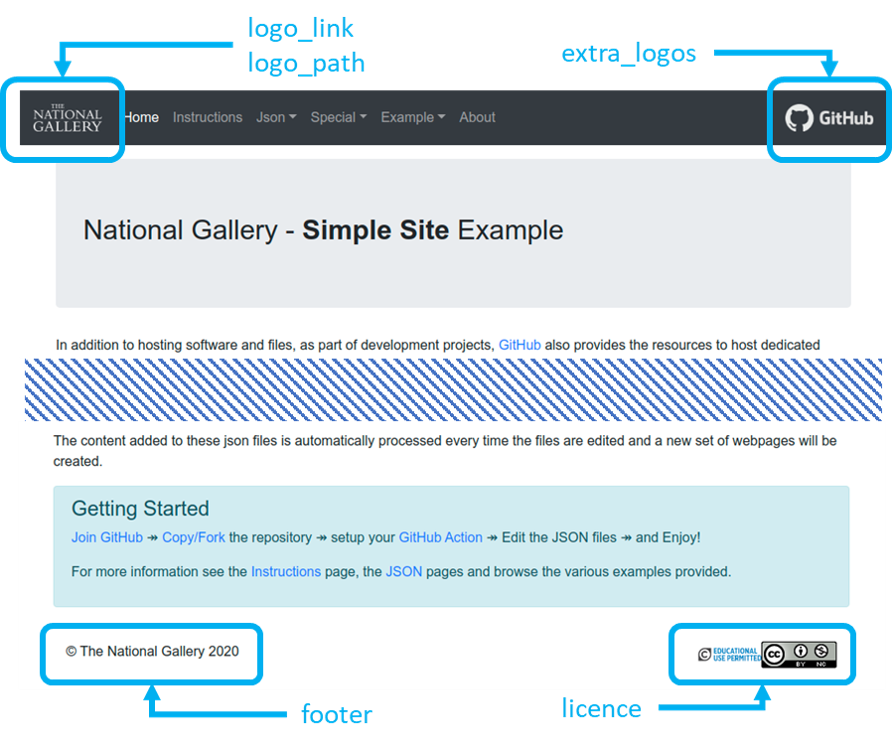
Logos & Links
As can be seen from the figure below the values in this section are reasonably straight forward and directly relate to the images and links that will appear on every page. These values are all optional and can be left blank, particularly the extra_logos details, but it is recommend that you do add an appropriate main logo and the required licence details.
Extra JS & CSS Code
For most simple projects the last section of values can be simply left blank as they are only required if more advanced users would like to add additional functionality or styling.
Google Analytics
The inbuilt GitHub analytics system will track how people interact with your project files and code but it does not track visitors to your actual webpages. So if analytics are required for your webpages as well an option has been added to use Google Analytics simply by adding your site Google Analytics ID to your site.json file. Instructions for setting up Google Analytics and getting an Analytics ID can be found here.
- [1] For more details see: https://en.wikipedia.org/wiki/Meta_element
Display the full code used to define this page.
Page JSON Object
{
    "parent": "json",
    "class": "",
    "file": "",
    "title": "Simple Site - The <b>site.json</b> file",
    "content": "<p>The <b>site.json</b> file is used to control a few of the more structural aspects of the web pages and relates to all of the pages that will be produced. It's content falls into three main parts: the meta, logos & links, and extras sections. The easiest method of creating your own <b>site.json</b> file is to copy the existing one that is provided with the project code and just edit it as needed. The sections shown below are cropped from a full file and contain descriptions rather than real values, for an example of real code please see this example [site.json|https://github.com/jpadfield/simple-site/blob/master/build/site.json] file.</p>\r\n\r\n<h4>The Meta values</h4>\r\n<p>'Meta elements are tags used in HTML and XHTML documents to provide structured metadata about a Web page'[@@For more details see: https://en.wikipedia.org/wiki/Meta_element]. They are used to defined a selection of hidden information which can be used by search engines and web browsers. At this time this project only makes use of 5 of these meta elements, further values could be added if required but this would require making adjustments to the project code rather than just the JSON file.</p>\r\n\r\n<figure>\r\n\t\t<pre style=\"overflow: hidden;border: 2px solid black;padding: 10px;\">\r\n<code>{\r\n  \"metaDescription\": \"Short project description, this can be used and presented by search engines\",\r\n  \"metaKeywords\": \"Used to help tag what your project is related to, this will assist search engines to find your project\",\r\n  \"metaAuthor\": \"Author Name|Author Email Address|Further Institutional Information as required\",\r\n  \"metaTitle\": \"Simple short title For Your website or project, which can be display in browser tabs\",\r\n  \"metaFavIcon\": \"URL for your chosen favicon.ico file (https://en.wikipedia.org/wiki/Favicon)\",\r\n...\r\n</code></pre>\r\n</figure>\r\n\r\n<h4>Logos & Links</h4>\r\n<p>As can be seen from the figure below the values in this section are reasonably straight forward and directly relate to the images and links that will appear on every page. These values are all optional and can be left blank, particularly the <b>extra_logos</b> details, but it is recommend that you do add an appropriate main logo and the required licence details.</p>\r\n\r\n<figure>\t\r\n<pre style=\"overflow: hidden;border: 2px solid black;padding: 10px;\">\r\n<code>...\r\n  \"logo_link\": \"The URL you would like the top left logo to point to a default would be \\\"./\\\" which would point to the home page of your project.\",\r\n  \"licence\": \"Clickable links/icons of indicating the relevant licence or re-use restrictions of your project\",\r\n  \"logo_path\": \"The full path or URL to the image you would like to appear in the top left corner\",\r\n  \"footer\": \"Optional copy right statement or link you would like to appear on the bottom left of the page \",\r\n  \"extra_logos\": {\r\n    \"1st Logo\": {\r\n      \"link\": \"The clickable link for this specific logo\",\r\n      \"logo\": \"The full path or URL for the required logo image file.\",\r\n      \"alt\": \"Optional first extra logo related to the project\"\r\n    },\r\n    \"2nd Logo\": {\r\n      \"link\": \"The clickable link for this specific logo\",\r\n      \"logo\": \"The full path or URL for the required logo image file.\",\r\n      \"alt\": \"Optional second extra logo related to the project\"\r\n    }\r\n  },\r\n...\r\n</code></pre>\r\n</figure>\r\n\r\n<div class=\"rounded mx-auto d-block\"><figure class=\"figure\"><img src=\"graphics/site-json.png\" class=\"figure-img img-fluid rounded\" alt=\"site.json image\"><figcaption class=\"figure-caption\">Annotated image highlighting which sections of the page are connected to each of the Logos & Links values.</figcaption></figure></div>\r\n\r\n<h4>Extra JS & CSS Code</h4>\r\n<p>For most simple projects the last section of values can be simply left blank as they are only required if more advanced users would like to add additional functionality or styling.</p>\r\n\r\n<figure>\r\n<pre style=\"overflow: hidden;border: 2px solid black;padding: 10px;\">\r\n<code>...\r\n  \"extra_js_scripts\": [\"A comma separated list of any additional javascript files that need to be included\"],\r\n  \"extra_css_scripts\": [\"A comma separated list of any additional css style sheets that need to be included\"],\r\n  \"extra_css\": \"Any additional css code that you need to be directly added to all of the pages\",\r\n  \"extra_js\": \"Any additional javascript code that you need to be directly added to all of the pages\",\r\n...\r\n</code></pre></figure>\r\n\r\n<h4>Google Analytics</h4>\r\n<p>The inbuilt GitHub analytics system will track how people interact with your project files and code but it does not track visitors to your actual webpages. So if analytics are required for your webpages as well an option has been added to use <a href=\"https://analytics.google.com/\">Google Analytics</a> simply by adding your site Google Analytics ID to your site.json file. Instructions for setting up Google Analytics and getting an Analytics ID can be found <a href=\"https://support.google.com/analytics/answer/10269537?ref_topic=1009620#zippy=%2Cadd-the-global-site-tag-directly-to-your-web-pages\">here</a>.</p>\r\n\r\n<figure>\r\n<pre style=\"overflow: hidden;border: 2px solid black;padding: 10px;\">\r\n<code>...\r\n  \"GoogleAnalyticsID\": \"G-XXXXXXXXXX\"\r\n}\r\n</code></pre></figure>",
    "content right": "",
    "copy": false,
    "displaycode": true
}